

Pedestrian Walk Deck Roofing Systems
Balconies are often referred to as walk decks or pedestrian decks. Regardless of the name, these systems function as roofs first. They must be fully waterproof while also being durable enough to handle regular foot traffic. Because they serve both purposes, walk deck systems require specialized materials and proper installation, which typically makes them more expensive than standard roofing systems.
Over time, a variety of walk deck systems have been used. Common examples include polyurethane-coated decks and acrylic systems. While these can perform well, they are not maintenance-free. Most rely on protective coatings that wear over time and require periodic reapplication to maintain their waterproofing performance.
One system that has proven to be reliable is the Pli-Dek® F-Deck System. This is a modified concrete pedestrian deck system installed over metal lath, reinforced with fiberglass, and finished with a durable wear surface. A key advantage of this type of system is that it can often be installed as an overlay on existing walk decks, making it a practical solution for both new construction and restoration projects.
Below is a general overview of how an overlay installation is performed.
Walk Deck Overlay Installation Overview
Step 1: Substrate Inspection and Repair
The wood substrate must be sound. Any rotted or deteriorated wood is removed and replaced. A solid substrate is critical—no walk deck system will perform properly if the structure beneath it is compromised.


Step 2: Seam Tape and Metal Lath Installation
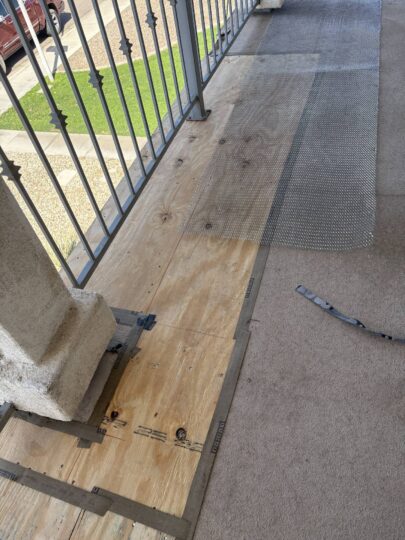
On new construction, seam tape is installed first. Metal lath is then fastened over the deck surface. The lath should be secured tightly so it does not move when pressure is applied. This typically requires a high volume of fasteners.
Staples are generally 1-inch crown with a 5/8-inch leg, installed until the lath is completely stable.
Step 3: Base Coat Application
A modified concrete base coat is hand-troweled into the metal lath. The goal is full encapsulation—no lath should be visible once the base coat is complete.
Coverage is typically 30–50 square feet per bag, depending on conditions and application thickness.

After the base has cured, any high spots can be knocked down using a grinder or stiff scraper to ensure a smooth, even surface for the next layer.
Step 4: Fiberglass Reinforcement and Resin Application
Fiberglass mat is laid over the cured base coat with approximately ¾-inch overlaps at seams. Resin is then applied using a trowel or 9-inch roller, working it through the fiberglass and into the base coat below.

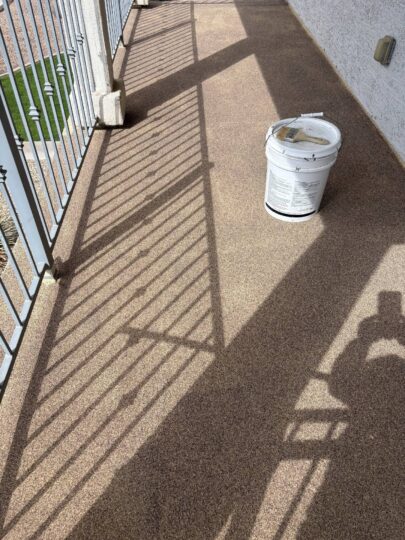
At this stage, different finish options are possible. I exclusively use a sand finish, as it provides excellent slip resistance while maintaining a clean, attractive appearance.
While the resin is still wet, #20 kiln-dried sand is broadcast generously into the surface. The goal is a uniform, sandpaper-like texture. After the resin cures, excess sand is swept away.
Step 5: Color Sealer Application
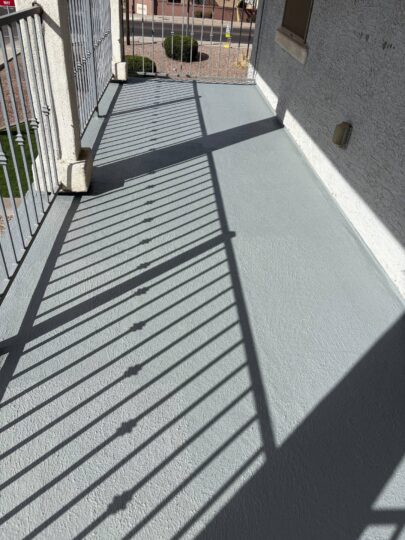
At this point, the walk deck is fully waterproof. The final step is applying the color sealer, which is available in a variety of colors.
The sealer is typically applied at a rate of 1 gallon per 100 square feet.
Once cured, the result is a durable, attractive pedestrian deck surface that holds up exceptionally well over time.
Durability and Maintenance Considerations
One nuance of the color sealer is that it does not blend well for spot touch-ups. If cosmetic consistency is important, the entire surface should be re-coated rather than patched.
According to manufacturer field representatives, these systems often require very little maintenance. In my experience, I recommend planning to re-seal the surface approximately every 10–15 years. That said, I’ve seen properly installed systems perform well for far longer.
When installed correctly, this type of pedestrian walk deck system is extremely durable and well-suited for Arizona conditions.